Fitting your own RJ45 connectors looks like technician's work, but the tools are simple and the steps can be learned in an afternoon. What makes it go wrong usually isn't a lack of skill but a handful of small habits: pairs untwisted too far, the cable jacket left outside the connector, or a connector that doesn't match the cable type.
This guide covers fitting and testing. Choosing the category and type of cable is in the guide to choosing LAN cable, so it isn't repeated here.
Tools and materials
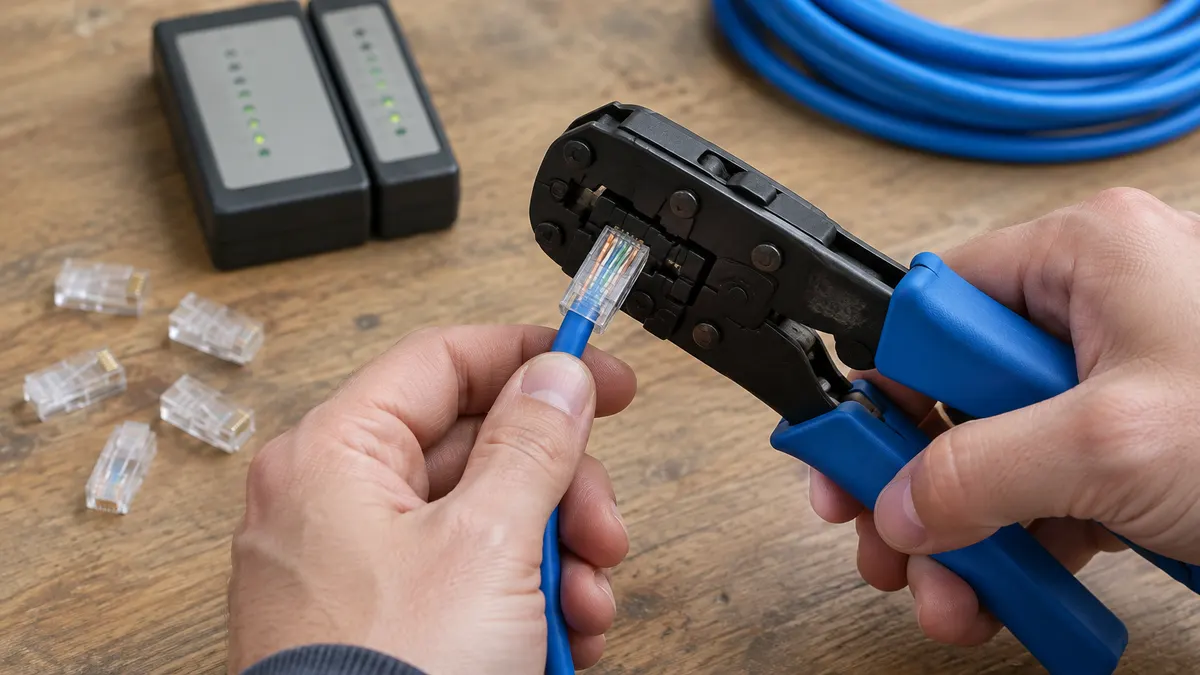
- A crimping tool. The pliers that press the connector's metal contacts into the wires. Nearly every crimper also has a cutting and stripping blade. If you use pass-through connectors, make sure the tool supports them, because a pass-through crimper has a blade that trims the wire ends as you squeeze.
- RJ45 connectors that match the cable's category and type. More on this in the next section, because this is where most mistakes begin.
- Boots (rubber covers), optional but useful. A boot protects the connector's latch from snapping when the cable is pulled through a tight gap.
- A LAN tester, a two-part device with a row of lights that checks each wire's connection.
- Small scissors or wire cutters to trim wire ends and cut the plastic spline in Cat6 cable.
Have a few spare connectors on hand too. On a first attempt, it's normal to waste one or two.
Choosing the right connector
Standard or pass-through
With a standard connector, the wire ends are pushed in until they hit the end inside the connector. You have to confirm from the outside that all eight wires have reached the end, and that isn't always easy to see.
With a pass-through connector, the front of the connector is open, so the wires can be pushed right through and out. You can check the colour order directly before crimping, and the excess is trimmed flush by the tool. For beginners this removes a lot of mistakes. The downside is that it needs a matching crimper, and an uneven trim can leave a wire end sticking out.
For solid or stranded cable
The metal contacts inside a connector are designed differently for solid wire (a single copper core) and stranded wire (many thin strands). Contacts for stranded cable pierce between the strands, while contacts for solid cable straddle the core. The wrong connector can look fine when tested, then loosen or fail a few weeks later. Check the packaging or product description; some connectors are marked as suitable for both.
Cat5e or Cat6
Cat6 conductors are generally thicker, and the cable often has a cross-shaped plastic spline in the middle. Cat6 wires usually won't fit, or have to be forced, into a Cat5e connector. Use connectors made for Cat6; many come with a small load bar to line the wires up before inserting them.
T568B and T568A colour order
Hold the connector with the latch facing down and the metal contacts facing up, open end towards you. Pin 1 is on the left.
| Pin | T568B | T568A |
|---|---|---|
| 1 | White-orange | White-green |
| 2 | Orange | Green |
| 3 | White-green | White-orange |
| 4 | Blue | Blue |
| 5 | White-blue | White-blue |
| 6 | Green | Orange |
| 7 | White-brown | White-brown |
| 8 | Brown | Brown |
The only difference is that the orange and green pairs swap places. Blue and brown stay where they are. Electrically the two are equivalent; T568B is the more common choice for ready-made cables and installations in Indonesia, so it's the more practical habit to adopt.
Look at pins 3 and 6: they're one pair (green in T568B), yet they sit on either side of the blue pair. That's deliberate. Arranging the colours "neatly" pair by pair actually separates wires that are meant to be twisted together, and a cheap tester won't catch it. The testing section explains why.
Straight or crossover
A straight cable uses the same standard at both ends, for example T568B and T568B. It's the cable you need for nearly everything: computer to router, router to switch, switch to access point.
A crossover cable uses T568A at one end and T568B at the other. It used to be needed to connect two devices of the same kind, such as computer to computer. Today nearly all equipment has Auto-MDIX, which detects and swaps the transmit and receive pairs automatically, so a straight cable works there too. Making a crossover cable only makes sense if you're dealing with very old equipment, and that's rare.
Step by step
- Slide the boot onto the cable first. This is the step most often forgotten. Once the connector is on, the boot can't go on.
- Strip about 2 to 3 centimetres of the outer jacket. Press the stripping blade only as hard as needed; you're cutting the jacket, not the insulation on the wires inside. Check that no wire has been nicked. If one has, cut the cable back and start again.
- Cut the rip cord and the plastic spline (on Cat6) flush with the end of the jacket.
- Untwist only as much as needed, straighten each wire with your fingers, and lay them out in order. The untwisted section should be no more than about 13 millimetres from the end of the jacket.
- Cut all eight wires flush, leaving about 12 to 13 millimetres beyond the jacket for a standard connector. For pass-through, you can leave them longer, since the tool will trim them.
- Push the wires into the connector with the latch facing down. Each wire must enter its own channel and reach the end. Look from the front and from above: all eight copper ends should be visible, level, at the tip of the connector.
- Make sure the cable jacket goes in too, past the plastic strain-relief wedge at the back of the connector. That wedge is what holds the cable when it's pulled.
- Check the colour order once more, then put it in the tool and squeeze fully in one firm motion. On a ratchet crimper, the tool only releases once enough pressure has been applied.
- Give the cable a gentle tug. A properly fitted connector doesn't move. Slide the boot up over the connector.
- Repeat at the other end in the same order, then test.
The most common mistakes
- Untwisting too far. It makes arranging easier, but the pairs lose their ability to reject interference. The cable may pass the tester yet drop to a lower speed or be unstable.
- Jacket left outside the connector. The rear wedge then clamps only the thin wires. Every pull loads the contacts directly, and eventually the cable breaks at the end.
- Connector doesn't match the wire type. A stranded connector on solid cable, or the reverse, often gives a joint that works today and drops in and out next month.
- Cat6 cable forced into a Cat5e connector. The wires don't run straight into their channels, can cross inside, and the contacts don't press properly.
- Wires not fully inserted. A wire a few millimetres short isn't pierced by its contact. Symptom: one tester light stays off, or the link only reaches 100 Mbps.
- Forgetting the boot. It doesn't affect function, but the only fix is cutting the connector off and redoing it.
Testing with a LAN tester
A cheap LAN tester has a main unit and a remote unit. Plug in both ends of the cable, switch on, and watch the lights. On a correct straight cable, lights 1 to 8 on both units come on in sequence together: 1 with 1, 2 with 2, and so on. The G light is usually for the shield on shielded cable, and it's normal for it to stay off on UTP.
Reading the result:
- One light stays off: that wire is broken or not reached by its contact, usually because it wasn't pushed all the way in.
- The remote unit lights in a different order: wires are swapped at one end.
- Two lights come on at once: two wires are shorted together, often because wire ends touch inside the connector.
The limits of a cheap tester
This kind of tester only checks continuity: whether each pin connects to the right pin at the other end. It doesn't measure attenuation, crosstalk between pairs, or cable length, and it can't tell you the cable is fit for 1 Gbps. That kind of test needs far more expensive certification equipment, normally used only by professional installers.
One mistake typically slips past a cheap tester: the split pair. If both ends are wired in the same wrong colour order, for example pairs laid out side by side as white-orange, orange, white-green, green, and so on, every pin still connects to the same pin at the other end. The lights look perfect. But pins 3 and 6, which should be one twisted pair, now sit in two different pairs, and the cable performs badly or fails at gigabit speed. That's why T568B or T568A has to be followed exactly, not just "the same at both ends".
A more honest test: link speed
Once the cable passes the tester, connect it between a computer and a gigabit-capable router or switch, and look at the link speed reported:
- Windows: Settings, Network & Internet, Ethernet, then check Link speed.
- macOS: System Settings, Network, select Ethernet, Details, then Hardware.
- Linux: the
ethtoolcommand followed by the interface name.
You're looking for 1 Gbps (1000 Mbps). If it shows only 100 Mbps when both devices support gigabit, there's most likely a problem in the blue or brown pair. 100 Mbps uses only two pairs while gigabit uses all four, so a bad wire in the other pairs can go unnoticed if you only try opening a website. For a more complete network check, see the guide to testing your network after a new installation.
If the cable also powers a device via PoE, such as an access point or camera, a clean termination matters even more, because a loose contact is also carrying current.
A 100 Mbps result isn't necessarily the cable's fault. On some ONTs and provider-supplied routers, not every LAN port supports gigabit. Before cutting the connector off again, check the label by the port or the device's spec sheet, then try the same cable in another port or on a gigabit switch.
Notes for homes and businesses in Indonesia
Watch out for CCA cable
In online shops, a reel labelled Cat6 at a price far below the rest often turns out to use CCA (copper-clad aluminium) wire, aluminium with only a thin copper coating. The TIA-568 network cabling standard requires copper conductors, so CCA cable doesn't actually meet the category printed on its jacket.
For crimping, the effect is immediate. Aluminium is more brittle, so the wire snaps easily near the connector after a few bends. Its resistance is also higher, so it heats up faster when used for PoE. Checking is simple: scrape the end of one wire with a cutter. Copper wire stays copper-coloured right to the core, while CCA shows a silvery colour beneath the outer layer.
Humidity, ceilings, and lightning
Humid air speeds up the dulling of metal contacts. Fit connectors and keystones indoors, not on a veranda or next to a bathroom, and don't leave terminated connectors lying on a wet floor for long during renovation work.
Runs above the ceiling are best placed inside a conduit or protective hose. Besides keeping things tidy, it stops rats chewing the cable jacket, a fault that often only shows up months later as a connection that keeps dropping.
Cable that leaves the building, say from the house to a warung (small shop) out front or to the house next door, needs an outdoor type with a sun-resistant jacket. Cable like this can also carry surges when lightning strikes nearby. Protective steps are in the guide to protecting network equipment from lightning and power surges.
Example: from the ONT by the front door to an upstairs bedroom
This is the most common case. The provider's technician installs the ONT near the entrance, while the work computer is in a room upstairs. A sequence that rarely fails:
- Measure the real route, through the ceiling or along the door frames, then add one to two metres as slack at each end.
- Pull the cable first, then fit the connector or keystone. A connector fitted before pulling often has its latch snapped off in the wall hole.
- Test with the tester and the link speed before the ceiling is closed or the cable is nailed down. Fixing it once it's covered is far more work.
- Label both ends, for example "ONT to upstairs room".
A shopping list that saves return trips
- A crimping tool, one that supports pass-through if you use that kind of connector.
- Connectors that match the cable category and wire type. They're usually sold by the box, so one box covers plenty of attempts.
- As many boots as connectors you'll fit.
- A LAN tester plus a spare battery.
- Copper cable, not CCA, in the route length plus slack.
When to buy ready-made cables instead
Making your own isn't always the best choice. For short patch cables, from laptop to router or from a switch to a device on the same desk, factory-made cables are usually better: the connectors are moulded on, the wire is flexible stranded, and many are tested at the factory. The price difference is small compared with the time and connectors you'd waste.
Making your own makes sense when:
- The cable has to pass through a hole in a wall or ceiling that a fitted connector won't fit through.
- The length you need isn't available, or you don't want a coil of spare cable.
- You're running many lines at once, for example during a renovation or when building a house.
- An old connector has snapped and the cable is permanently installed.
Cable in the wall: use a keystone
For solid cable buried in a wall or ceiling, better practice is not to put an RJ45 plug directly on the end. Instead the cable is terminated on a keystone jack, a socket that fits into a wall data outlet or a patch panel. The wires are pressed into the keystone's terminals with a punch-down tool, or with the pressing cap on a tool-less keystone. Nearly all keystones have A and B colour labels printed on the body, so you just follow them.
From the keystone, devices connect with an ordinary patch cable. The solid cable in the wall is no longer bent and unplugged every day, and if something gets damaged, only the patch cable needs replacing. Once everything is in, label each point and note where each run goes, as described in the guide to documenting your own network.
In short
Crimping an Ethernet cable isn't difficult, but it demands care over small details. Use a connector that matches the category and wire type, follow T568B exactly at both ends, untwist as little as possible, and make sure the cable jacket is clamped inside the connector.
Then test twice: with a LAN tester to confirm every wire is connected, and with a computer to confirm the link speed really is 1 Gbps. A tester that lights up fully only means the wires are connected, not that the cable is good.
And for short cables on the desk, there's no shame in buying them ready-made. Your effort is better spent on the cables you can't buy that way.
Frequently asked questions
What is the correct Ethernet wire colour order?
For T568B, pins 1 to 8: white-orange, orange, white-green, blue, white-blue, green, white-brown, brown. T568A swaps the orange and green pairs. Both work equally well, as long as both ends of the cable use the same standard.
Do I still need to make crossover cables?
Almost never. Modern network equipment has Auto-MDIX, which swaps the transmit and receive pairs automatically, so an ordinary straight cable works for computer-to-computer or switch-to-switch links.
If every light on the LAN tester comes on, is the cable definitely good?
Not necessarily. A cheap tester only checks that each wire reaches the same pin at the other end. It doesn't measure signal quality. Also confirm that the computer reports a 1 Gbps link speed over that cable.
How can I tell whether a LAN cable is genuine copper or CCA?
Scrape the end of one wire with a cutter. Genuine copper is copper-coloured right to the core, while CCA shows silvery aluminium beneath its thin coating. A price far below other reels of the same category is also a warning sign.